• Skip to main content

Adore Them Parenting

Practical Positive Parenting Advice and Resources

Practical Positive Parenting

Go here for our book!

  • About Us
  • Our Book
  • Parenting Advice
    • Raising Children
    • Family Life
    • Seasonal
    • View All Topics
  • Free Printables
  • In the Media
  • Shop

Karissa Tunis

Organizing Our New Toy Room!

organizing our toy room

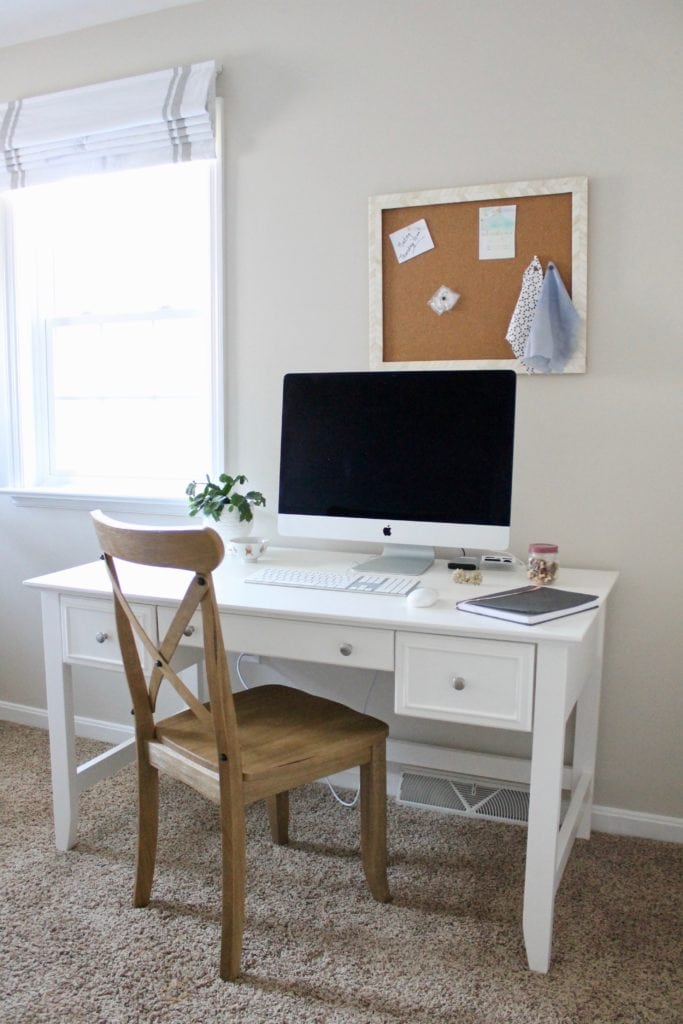
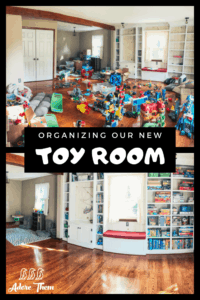
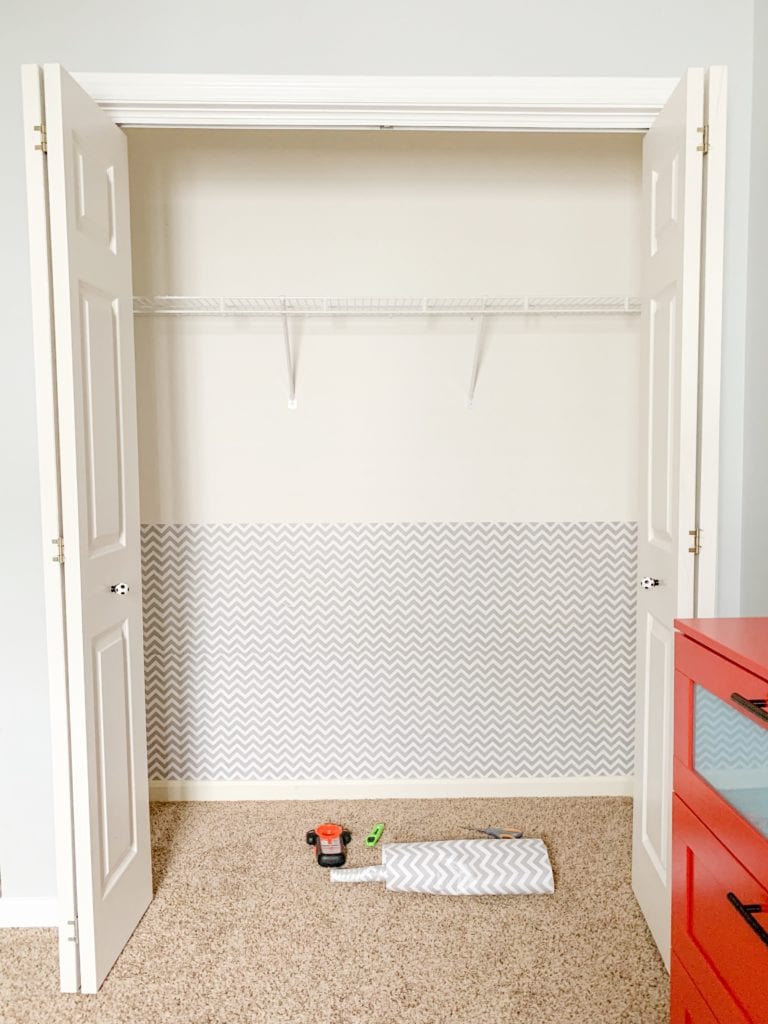
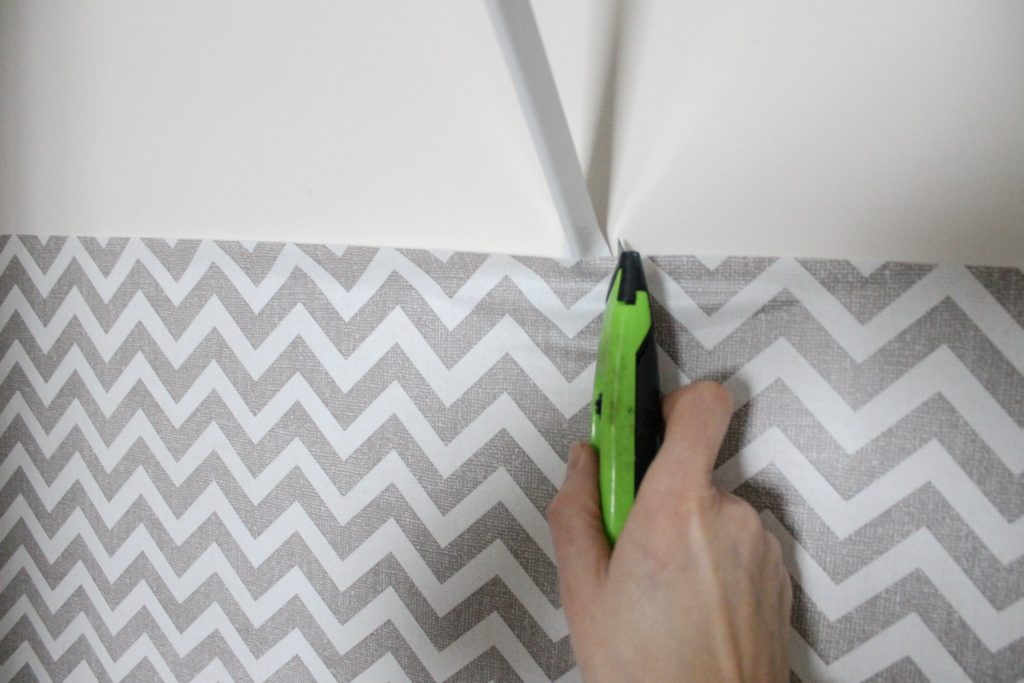
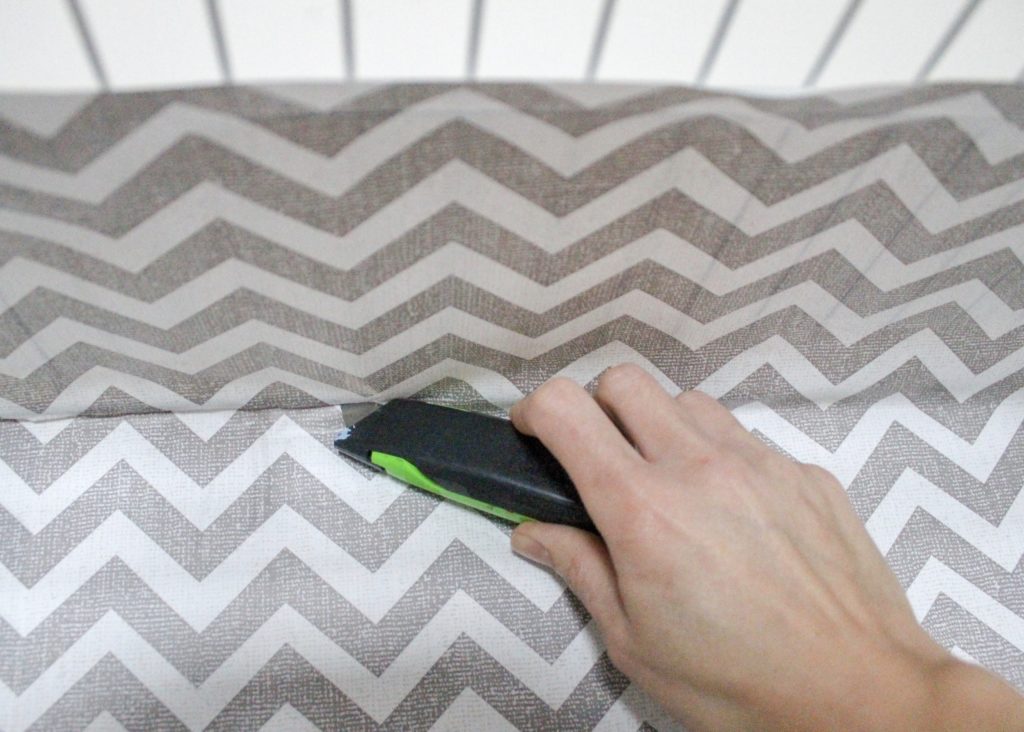
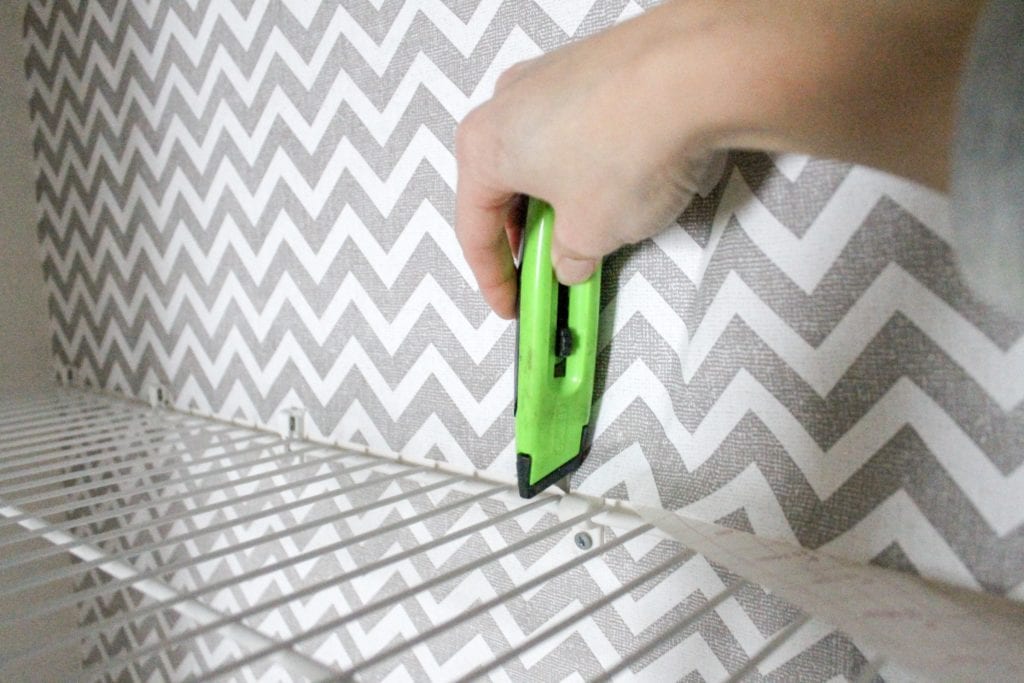
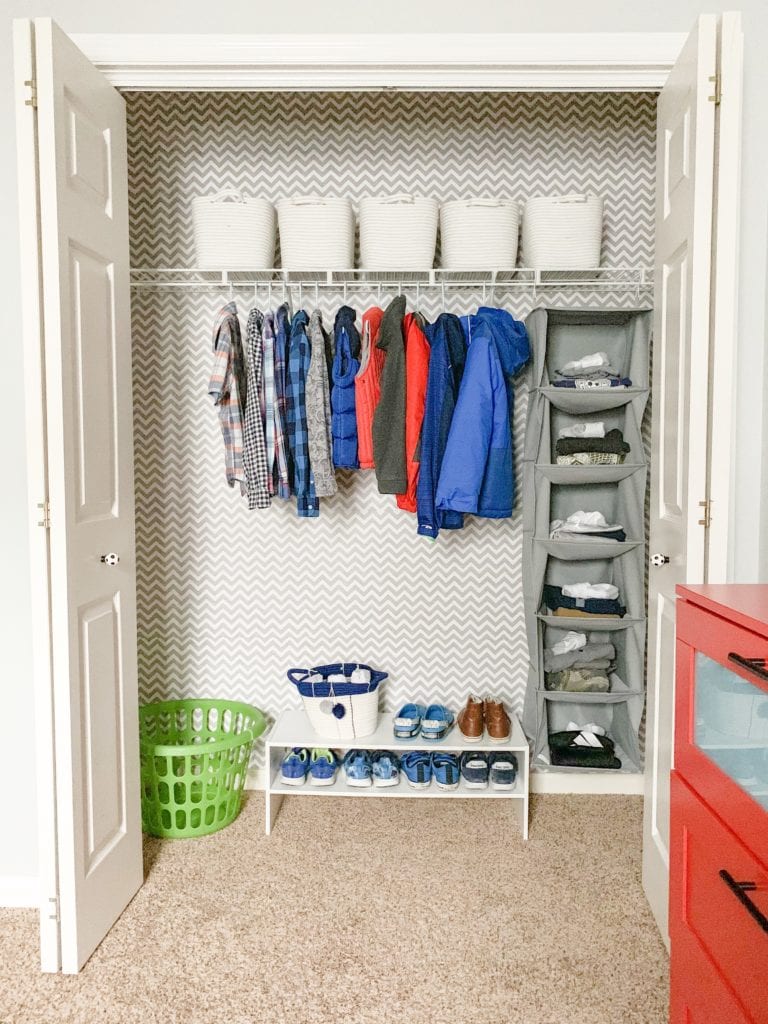
When we moved into our new house, I knew that the toy room was going to have to be one of the first projects that I tackled. Since the toys had been in storage for a little while, the boys were eager to find all of their old favorites. And since school had just let out, I wanted them to be able to have a functional playroom to help keep them occupied over summer break. Organizing the toy room was top priority!

…

Read More

Filed Under: Get Organized

Slow Cooker BBQ Chicken

slow cooker bbq chicken

No time to cook? Slow Cooker BBQ Chicken is an easy, delicious solution. The chicken is rubbed with spices and flavored with your favorite sauce. Super affordable, and very easy to make for busy weeknight dinners, or even for your favorite dinner guests!

To make ahead to freeze, simply prepare the ingredients in a gallon freezer bag, label, and store in the freezer. To serve, thaw the bag in the refrigerator overnight; then dump contents into your slow cooker and follow the directions below. …

Read More

Filed Under: Get Organized

How to Organize Kids’ Stuff at Home

How to Organize Kids' Stuff at Home

I have always been a pretty organized person. I kept a clean room growing up; and as a young wife I like to focus on a neat and tidy home. Both my husband and I are actually a bit obsessive when it comes to neatness. Then we had our first baby and began wondering how to organize kids’ stuff at home… especially when they’re little!

Do you know how much “stuff” comes along with a baby?!

It was everywhere and on every surface…we had to settle for organized chaos. A few years later, we had another child. In the midst of our “organized chaos”, we were still feeling stressed with all the toys, clothing, arts/crafts and general “stuff” laying around. I needed to be strategic about how we organized so that the mess wasn’t impacting our well-being.

…

Read More

Filed Under: Get Organized

How to Install Contact Paper and Easily Revamp Your Closet

diy project - contact paper in closet

The beginning of a new year offers a fresh start. So it’s only natural to want to get organized for the year ahead! When I looked around our home for areas in need of organization, my youngest son’s closet was high on the list. It was a disorderly mess with bins of collected school work and keepsakes that were overflowing and didn’t belong. After they were sorted through and removed, this left his closet full of possibilities. Keep reading to learn how to easily revamp your closet, and how to install contact paper, all on a small budget!


This post contains affiliate links

This article is written by Pamela Rineer
For more on this topic, check out the full Get Organized collection


closet DIY


The Start of a Closet Makeover

Next, I cleaned out the closet completely to start with a blank slate.  Once clear, it needed a pop of color or design. I wanted this makeover to take one day, and get done on a budget. Knowing this I had two options – paint or wallpaper.

I headed to the closest Target to find a peel and stick wallpaper in a fun design. I found most wallpaper options were on the pricey side. My friend mentioned that I should just use contact paper and a light-bulb went off! So I picked up three rolls of contact paper in the kitchen department that were on sale for around $17 total, half the cost of one roll of wallpaper at the same store!

DIY Tip – It pays to shop around and think outside the box! I’ve even seen some great contact paper at the Dollar Tree!

Once home, I got straight to work.


Tools Needed to Revamp Your Closet

  • Scissors
  • Utility Knife
  • Contact Paper
  • Measuring Tape
  • Laser Level
  • Pencil


Revamp Your Closet Carefully

First measure the closet to get the dimensions.

When I purchased paper I bought three rolls. I still have about half a roll left, but it’s best to have more than not enough.


Work the wall bottom to top.

I think it may have also worked fine to do it from top to bottom. So start at either end, but just not in the middle! And knowing that this was a closet, my goal was simply better than before – not perfect.


Do not assume your walls or trim are straight.

Use a laser level to get a straight line. Then line the wall with your pencil – the width of your paper from trim up.


Begin Applying the Contact Paper

Begin by peeling a few inches of the contact paper off the backing sheet, and attach it to the corner of the wall level to your pencil line. Be sure to leave an inch or two overhang on the side and bottom edges. This will give you a perfect line, and offer a clean cut. Only unroll the contact paper off the backing a few inches at a time, peeling off and reattaching as needed for wrinkles and bubbles. Work your way horizontally across the wall.

When you get to the other side, use your utility knife to cut off the excess paper leaving a straight, clean edge. Use a squeegee, cloth, or smoothing tool to remove wrinkles. Puncture any bubbles with a pin and smooth.

cutting contact paper

Step 1

Take your roll and again peel off an inch or two of the backing, moving up, begin lining your second area of the wall. Contact paper may not have an exact repeat. Meaning the pattern doesn’t repeat itself perfectly. Which is why I probably wouldn’t use this on a wall in my living room. But, for closets, it works great. The repeat on the contact paper I was using didn’t line up seamlessly. However, it is now hardly noticeable.

Closet DIY

Step 2

Continue to repeat the process as you move your way up the wall. Because the closet I was working in already had a wire shelf and rod, I didn’t want to remove it. Working a few inches at a time and unrolling the paper as I went across the wall I stretched the paper over the shelf bracket. Once sealed, I used a utility knife to cut around the bracket and smoothed out the edges.

Applying Contact Paper Around Shelves

Step 3

To apply the paper behind the brackets and under the shelf, I cut the paper into three small manageable sections. I used the utility knife to cut around screws and shelf brackets, as well as cutting the excess paper below the shelf.

On top of the shelf I used the shelf as my guide to unroll the paper in a straight line, again using  the utility knife to cut around brackets.

cutting contact paper around shelves

Step 4

Repeat the hanging process as you move up the wall and on each side, removing and reattaching as needed. Making sure to smooth wrinkles and bubbles as best you can.

closet DIY with contact paper

Step 5

When complete, it was time to organize. The first thing I did was purge! Everything that was too small, unused, or belonged in a different home was removed. Clothes that were too large were stored in empty drawers under the bed for later use.

Closet DIY Reveal

Reorganizing Your Closet

Before, the hanging organizer was underutilized, now it’s perfect for getting a weeks worth of clothes ready for my early riser.

I purchased the same inexpensive shoe rack and soft baskets that we use and love from this closet makeover here.

The basket on the shoe organizer holds socks.

One unseen addition are these Olivia and Aiden air purifying bags. I added them to the entry closet a couple weeks ago and noticed a vast improvement in the smell.

The whole makeover took only 2 hours to complete. Now everything has room to breath and looks great. I hope this inspires you to use contact paper as an easy alternative to add a fun, inexpensive pattern when organizing closets in your home!

Ready to tackle another DIY project?! Check out DIYIdeaCenter.com

For more on this topic, check out the full Get Organized collection


Featured Contributor: Pamela Rineer

Pamela Rineer lives in Lititz, PA with her husband, two boys, and very large goldendoodle. With a love of real estate, design, and money management she began renovating their homes on a budget. Now, settling into their fifth house, she shares simple DIY’s for all things home.

  • Instagram: @pamelarineerinteriors  
  • Facebook: @pamelarineerinteriors
  • Pinterest: @pamelarineerinteriors
  • Website: pamelarineerinteriors.weebly.com


diy project - contact paper in closet

Filed Under: DIY, Get Organized

Free Daily Planner Printable for Parents

Parents wear a lot of different hats on a daily basis. But something as simple as this daily planner printable for parents can make life easier! It helps to prevent things from slipping through the cracks. And it helps you to stay focused on the things that are most important (including your own health and happiness). Print as many copies as you would like below!…

Read More

Filed Under: Free Printables, New Year New Goals

New Year, New Goals – Family Conversation Starters

We hear all the time how important it is to open up the lines of communication. Communication improves relationships with partners, friends, & coworkers; but we can’t forget that it also improves our relationships with our children.

Taking the time to have a genuine conversation with your child can be so much fun & so insightful! It also helps to build up a great family bond, which is why we are offering a few family conversation starters to go a long with each curated collection of content.

Save these to your phone or print them out, but use them as a starting point for fun & interesting family conversation 🙂


For more on this topic, check out the full New Year New Goals collection

– Click to view full-size –

Family Conversation Starters - New Year, New Goals


Filed Under: New Year New Goals

How to Make Resolutions Stick All Year Long

make resolutions stick all year long

New Year’s Day is not the only time to think about change, because every day brings a fresh start. Of course, since my focus is parenting and family, my questions for you are – “What could be better in your family, and how will you get the ball rolling?” And, “By the end of the year, what would you like to see already in play?” These questions can help guide us into setting a new parenting goal, or making a New Year’s Parenting Resolution. But you might be thinking “Great questions! But how do we actually make these resolutions stick all year long?” Well, keep reading below to find out! …

Read More

Filed Under: New Year New Goals

New Goals Printable for the New Year

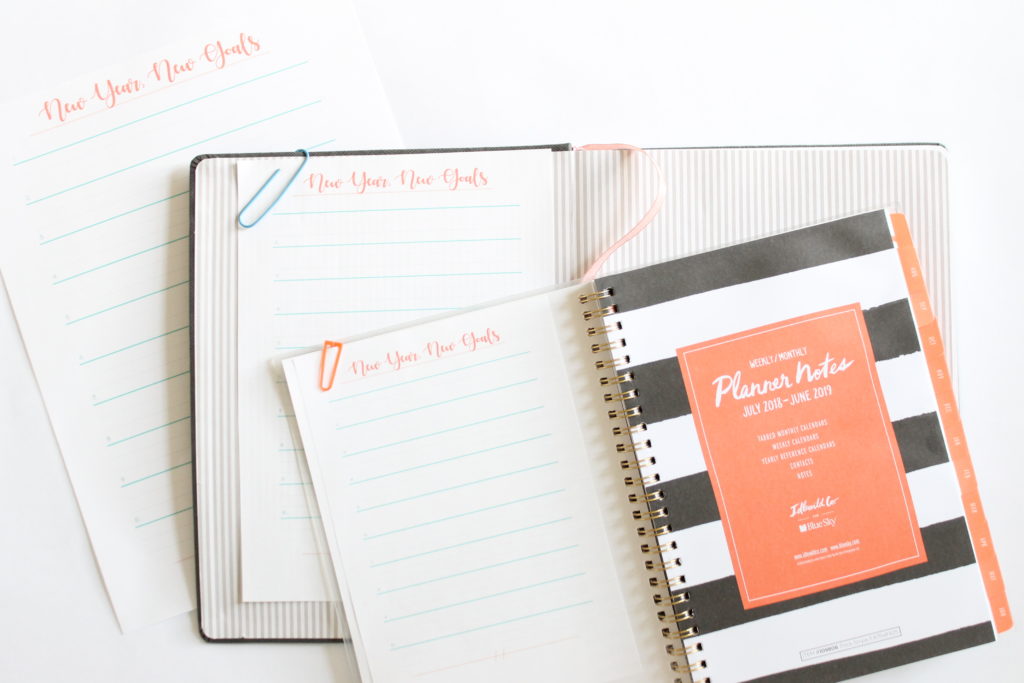
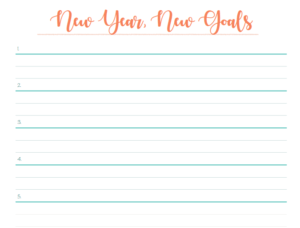
Take advantage of this free New Goals Printable. Print out several copies, and place them in your most important places. I always keep one in our financial binder, my To Do planner, and my note keeping journal. That way my goals are always in the forefront and I’m more likely to accomplish them. One thing to note, I don’t focus on themes, words, or target dates. But, those are options if you find them helpful. I find that if I keep it simple, I’m more likely to accomplish all my goals by the end of the year, and sometimes more!

If you need a little help coming up with some new goals, or even a New Year’s Resolution, check out Goal Ideas for the New Year for some fresh ideas and free inspiration to help you get started today! Setting goals and working towards them is a good way to stay dedicated and disciplined; and it will help you continue to move forward in life.

Happy Goal Setting!
…

Read More

Filed Under: Free Printables, New Year New Goals

Which Health Screenings Will You Need This Year? – A Health Screening Infographic

which health screenings do I Need this year_
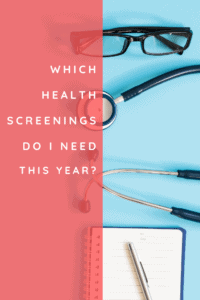
Now is a great time to schedule your doctor appointments for the year ahead. You do so much for everyone around you, but make sure you are also making your own health a priority! Scroll down for our Health Screenings Infographic. This will help you determine which health screenings you will need this year based on your age and gender.

Regular check-ups and health screenings are key to staying healthy. And the recommendations for these visits vary depending on your age. Below are some basic guidelines, but please speak with your medical provider for a more in-depth comprehensive list; and to find out what is right for you and your health.

Each person is unique. And we each require something different based on our body’s needs. But below offers a great starting point, and will hopefully help guide you to asking your doctor the right questions at your next visit. No one is going to fight for your health like you, and no one is going to advocate for your needs like you. So stand up for yourself, and start living the healthy life that you deserve.

And if you are looking for some additional inspiration on setting some new goals, or making a New Year’s Resolution, check out Goal Ideas for the New Year. Here you will find lots of fresh new ideas, and free inspiration on how to get started today.

Whatever goals you end up setting, try to make this next year your best one yet! Happy New Year!


This infographic was created by Karissa Tunis
Check out the full New Year New Goals and
 Staying Healthy collections


Which Health Screenings Will You Need This Year?

View the infographic below, or get the free downloadable PDF!


For more on this topic, check out the full New Year New Goals or Staying Healthy collections

which health screenings do I Need this year_

Filed Under: New Year New Goals, Staying Healthy

New Year’s DIY Projects

New Year DIY's
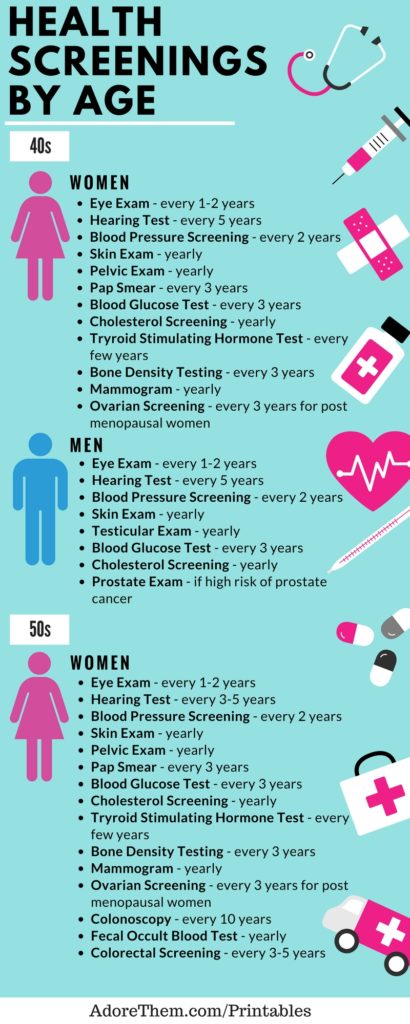
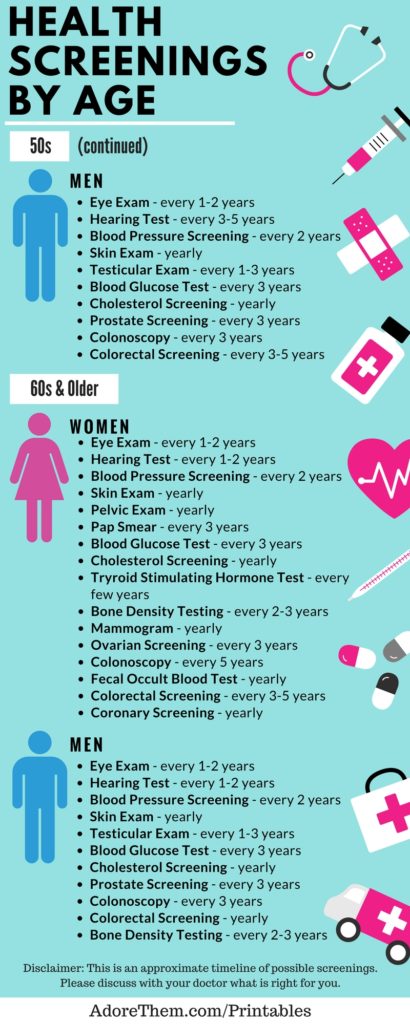
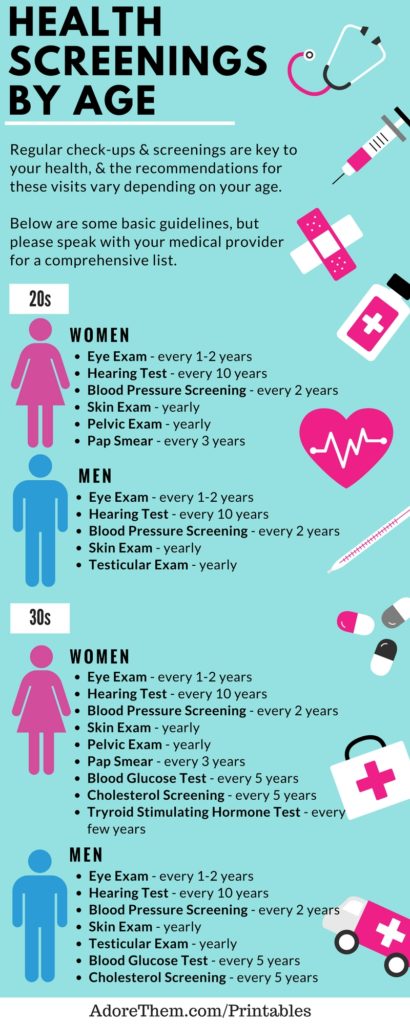
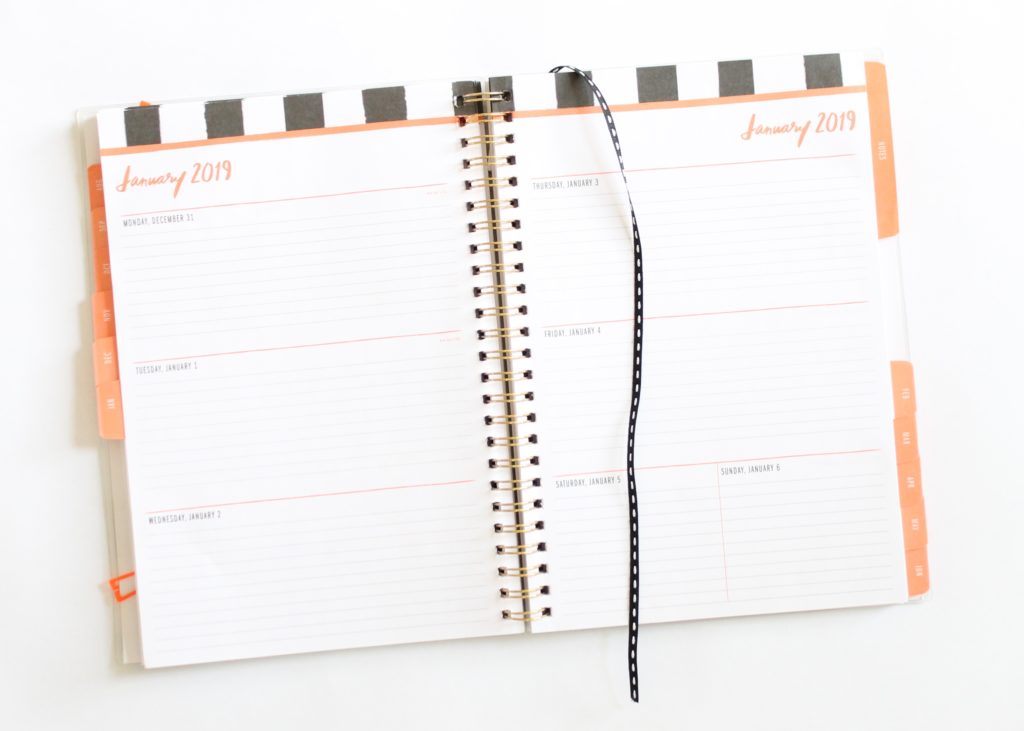
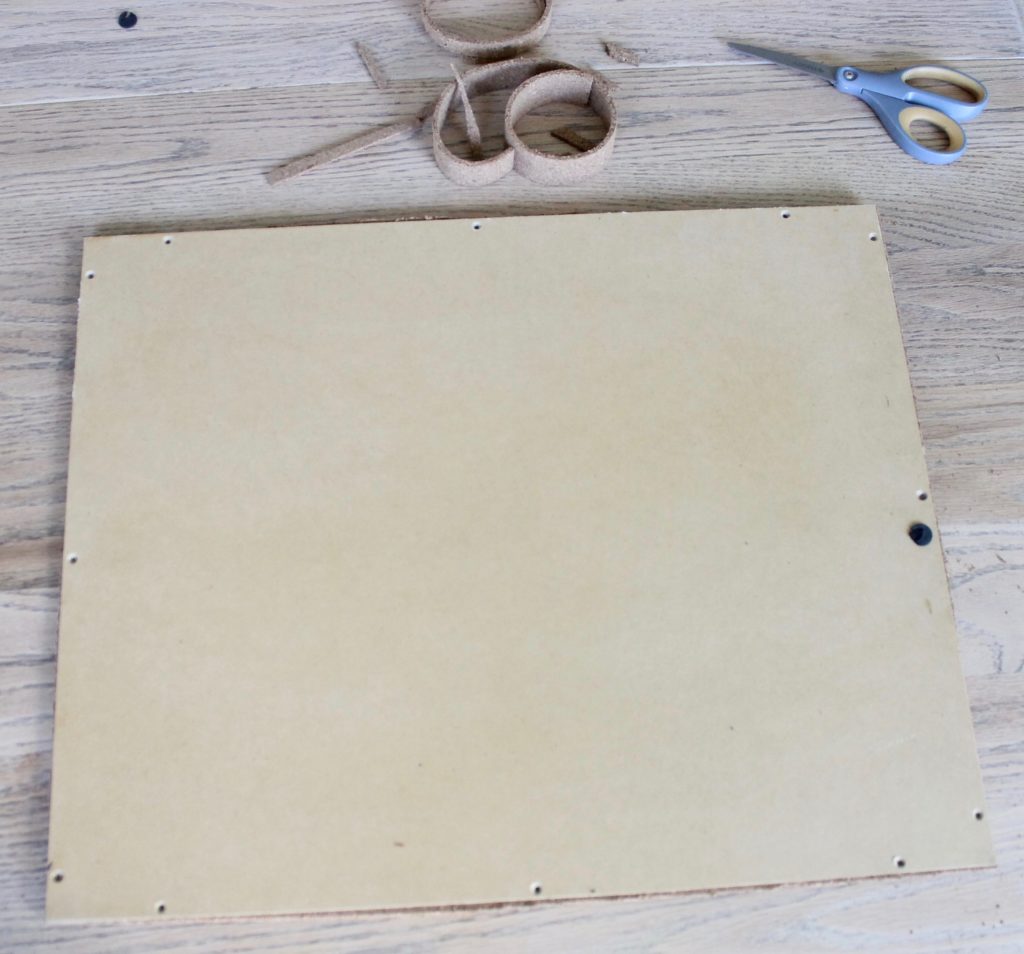
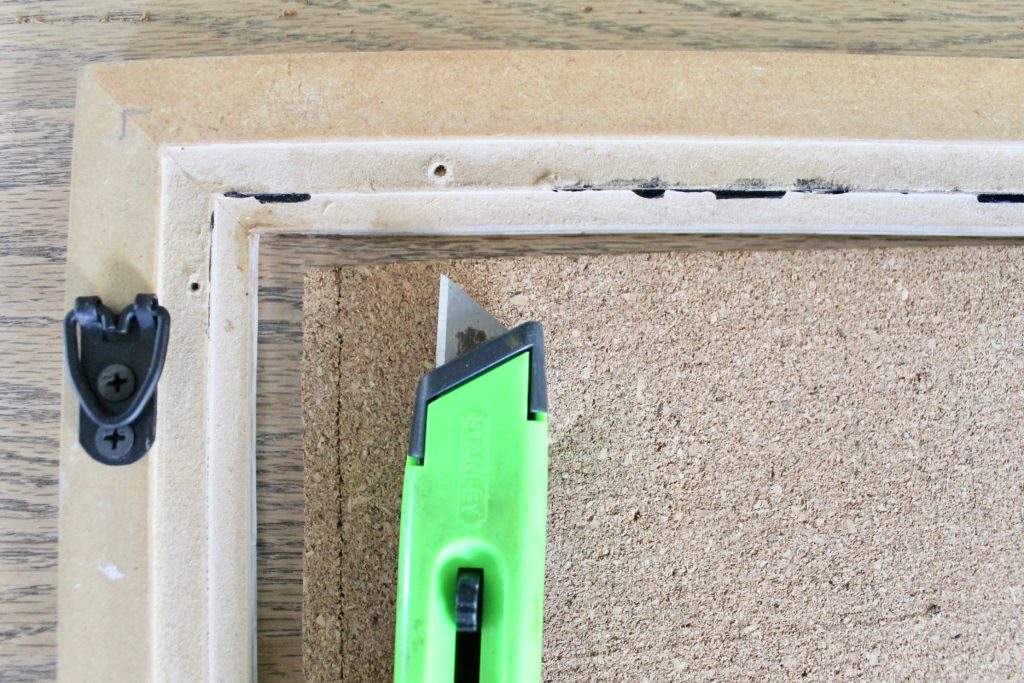
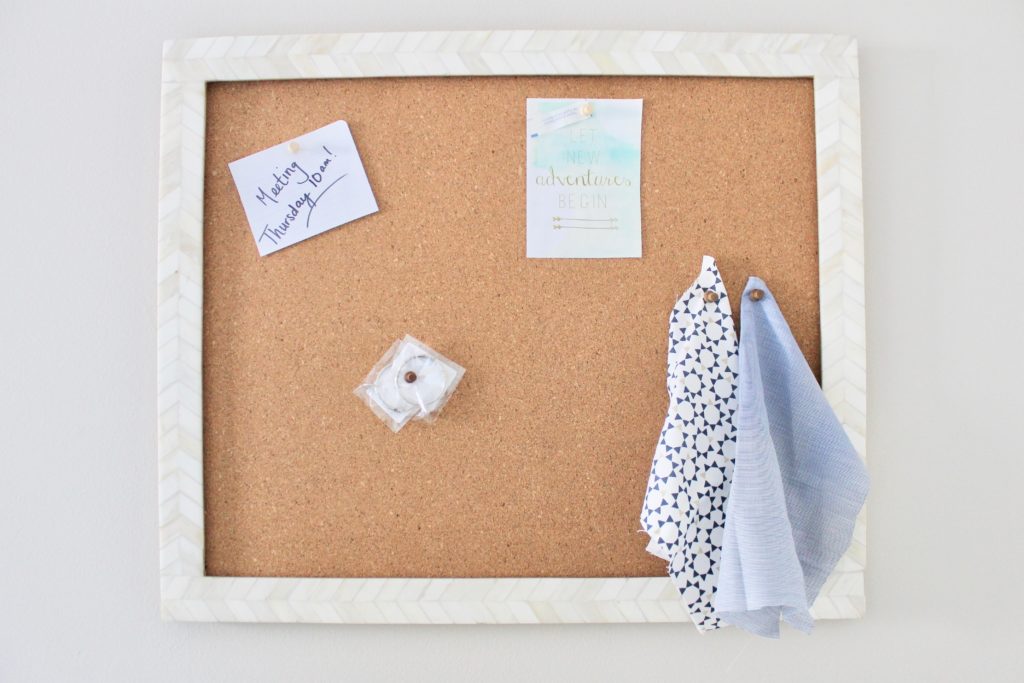
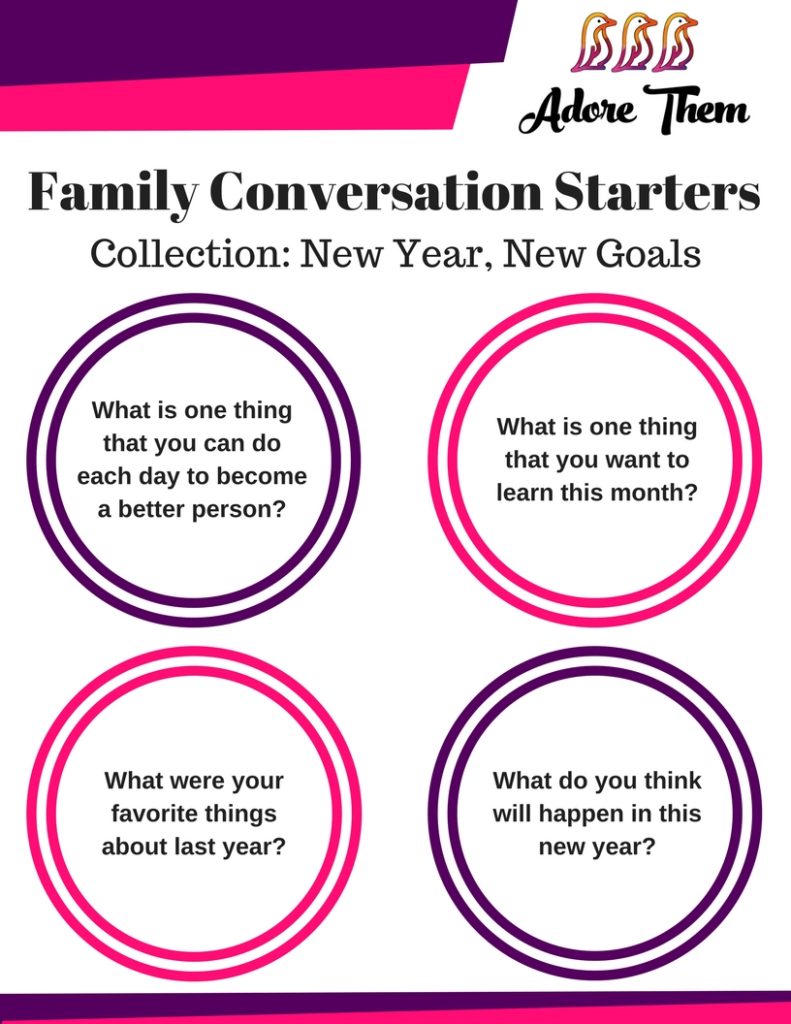
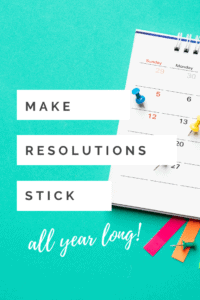
As the New Year approaches, it’s a great time to set goals and get organized. Here are two simple ways to set goals, and a DIY to help you start your New Year off with a bang! Continue scrolling down for free step-by-step guides to our New Year’s DIY projects that are sure to impress everyone in your home!


This article is written by Pamela Rineer
For more on this topic, check out the full New Year New Goals collection


New Year’s DIY Project – Daily Planning

Now is the perfect time to get a new planner.  No, this isn’t for appointment keeping. With the help of our phones and digital calendars, options like Google Calendar keep your whole family in sync. However, a planner is the perfect companion for your daily to do lists. It’s so simple! Any planner will work, I prefer a planner that has each date with plenty of lines to write each goal for the day.

Write down all the things you need to accomplish that day and cross them off your list when you’re done. This can be a running list, or you can put certain tasks on specific dates. If the day ends and some items haven’t been completed, just carry them over to the next day. My goal is to accomplish three tasks on any given day. It doesn’t sound like a lot. But if one of the tasks is laundry, it can feel daunting. So break those tasks up! I’d never put laundry and bathrooms on the same day, because those are my least favorite chores. Here is a very messy but realistic look at how I plan a week.

I always find the best planners at Target, HomeGoods, T.J. Maxx, and Marshalls.  Look for something you’ll want to use all year long. I prefer spiral bound, a spot for my pen, and a book ribbon or elastic band.  My book didn’t come with one, but you can always add a ribbon, hair or rubber band for the elastic.

planner example

New Year’s DIY Project – Set Goalsgoal sheet

Plan your year in advance and set your goals. Go through your calendar month by month, and based on family vacations, weekend trips, and various events and happenings throughout the year, you’ll already have a good idea of what your year in advance looks like. Take the time and put those in your online calendar at the beginning of the year. Nothing has to be set in stone and plans can shift though the year. Set your goals early and at the end of the year you won’t be left disappointed.

Once everything is in the calendar, sit down and create a goal list. These are your top ten goals. Sometimes they include family, work, home, or financial goals. These are all goals that you absolutely want to achieve in the new year.  Write your goal, and then most importantly, write exactly how your’e going to accomplish it.

For goal ideas, and free inspiration on how to get started, check out Goal Ideas for the New Year.

Be sure to print your goal sheet and place them in your most important places. I always keep one in our financial binder, my To Do planner, and my note keeping journal. That way my goals are always in the forefront and I’m more likely to accomplish them. One thing to note, I don’t focus on themes, words, or target dates. But, those are options if you find them helpful. I find that if I keep it simple, I’m more likely to accomplish all my goals by the end of the year, and sometimes more!

Print out this free New Year, New Goals Sheet


New Year’s DIY Project – Bulletin Board

Our house is in constant flux as I plan our ongoing room renovations. Although we have an office, we know it will be much better served as a laundry and mudroom. Which means that most of my work is done at our dining room table. As my business grows, so do my needs to stretch out and have a work space of my own. So, I recently created a small corner office in our guest bedroom.


The mirror on the wall was perfect when I had a cabinet below for guests to use. Now it feels out of place and a full length mirror on another wall better suits guests. What is needed is a bulletin board to pin inspiration, ideas, and upcoming project design boards.  This will ensure that I can reach all my goals and stay on task throughout the year! I love the mirror frame and knew that finding a beautiful bulletin board inexpensively would be difficult so I decided to DIY a bulletin board with the bone inlay mirror frame.


This can be recreated with any mirror or picture frame.

For this DIY Bulletin Board project you’ll need:

  1. Mirror or Picture Frame
  2. Cork Board Roll
  3. Spray Adhesive
  4. Screwdriver
  5. Utility knife and/or scissors
  6. Measuring Tape
  7. Box (Optional)

Step-by-Step Guide for DIY Bulletin Board

First, remove the screws and take off the frame backing and set aside.


Carefully remove the mirror from the frame. There will be mirror adhesive that you will need to cut gently away with your utility knife.

The back of the frame will now become what you spray glue to attach the cork board.

On the reverse side of the frame backing (the side that faced the mirror and will now hold the cork) spray adhesive following the directions on the can.

Note – Use a high strength spray adhesive to ensure it sticks with no bubbles.


Roll the cork board onto the frame backing carefully, cork board is brittle and breaks easily.

Use scissors or a utility knife to cut the cork to size.


At this point, depending on the inside of your frame, you may be able to reattach the back and have a finished bulletin board.

On the frame shown, the holes for the screws need to be trimmed away from the cork board so that the back can sit inside the frames beveled edge.


Measure the width of the edge and use your utility knife to cut that same width off your cork board edge the entire way around.

Place the cork backing into the frame and screw each back into place.

Now you have a perfect custom bulletin board.


Ways you can take this DIY further:

Paint or stencil a design on the cork board

Cover the cork board with fabric, stretch and staple to the back
Keep the mirror and cover the frame with painters tape for overspray, spray paint the mirror with magnetic paint, chalkboard paint, or dry erase paint!  I actually have two of the bone inlay mirrors and I may do this and hang them beside each other vertically for even more organization!

I hope sharing these simple ways to stay organized and set goals will help you accomplish everything big and small this year!

For more on this topic, check out the full New Year New Goals collection


Featured Contributor: Pamela Rineer

Pamela Rineer lives in Lititz, PA with her husband, two boys, and very large goldendoodle. With a love of real estate, design, and money management she began renovating their homes on a budget. Now, settling into their fifth house, she shares simple DIY’s for all things home.

  • Instagram: @pamelarineerinteriors  
  • Facebook: @pamelarineerinteriors
  • Pinterest: @pamelarineerinteriors
  • Website: pamelarineerinteriors.weebly.com


New Year DIY's

Filed Under: DIY, New Year New Goals

  • « Go to Previous Page
  • Page 1
  • Interim pages omitted …
  • Page 107
  • Page 108
  • Page 109
  • Page 110
  • Page 111
  • Interim pages omitted …
  • Page 134
  • Go to Next Page »

Copyright© 2026 · Brunch Pro Theme by Shay Bocks

We use cookies on our website to give you the most relevant experience by remembering your preferences and repeat visits. By clicking “Accept”, you consent to the use of ALL the cookies.
Cookie settingsCLOSE and ACCEPT
Manage consent

Privacy Overview

This website uses cookies to improve your experience while you navigate through the website. Out of these, the cookies that are categorized as necessary are stored on your browser as they are essential for the working of basic functionalities of the website. We also use third-party cookies that help us analyze and understand how you use this website. These cookies will be stored in your browser only with your consent. You also have the option to opt-out of these cookies. But opting out of some of these cookies may affect your browsing experience.
Necessary
Always Enabled
Necessary cookies are absolutely essential for the website to function properly. This category only includes cookies that ensures basic functionalities and security features of the website. These cookies do not store any personal information.
Non-necessary
Any cookies that may not be particularly necessary for the website to function and is used specifically to collect user personal data via analytics, ads, other embedded contents are termed as non-necessary cookies. It is mandatory to procure user consent prior to running these cookies on your website.
SAVE & ACCEPT